Step #1: Create a the Field Groups
- Log in on the back end.
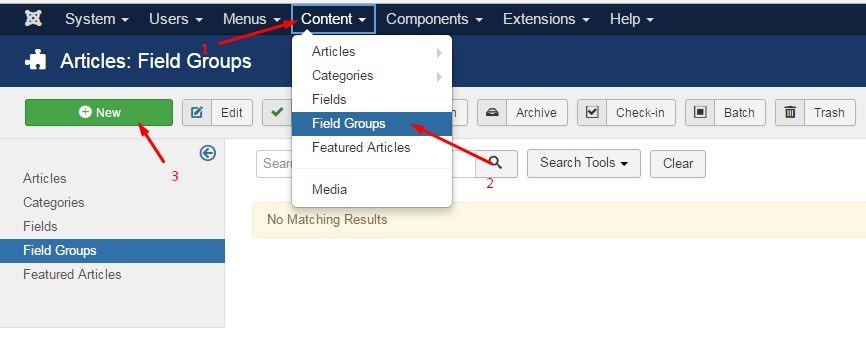
- Navigate to Content -> Articles.
- Click Field Groups.
- Click on the New button on the top.

Set the value for the Field Group
- Define a title and description.
- Save and close

Step #2: Create a the Fields
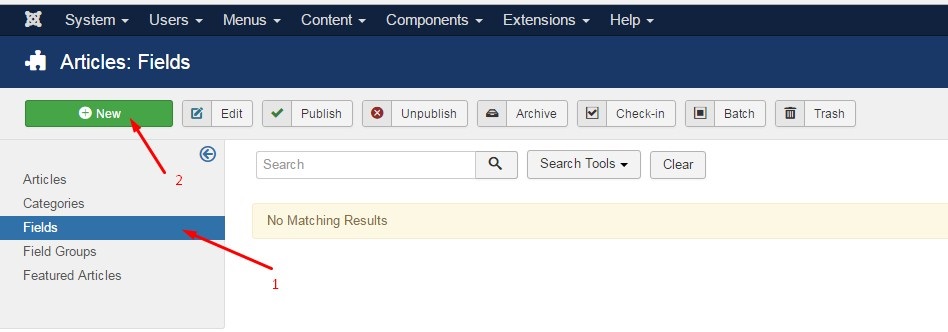
- Click on the left sidebar on Fields.
- Click on the New button on the top.
- Enter the required details:
- Title *
- Label *
- Field Groups. Choose the one you just created in the previous step.
- Type*. Choose from the available field types:
- Calender
- color
- gallery
- Captcha
- Checkboxes
- Color
- Editor
- Image
- Integer
- List
- Media
- Article
- Radio buttons
- SQL
- Telephone
- Text
- Text area
- Time zone
- URL
- User
- Usergroup
- Yes or No
- Required. Set as "yes" if this field is mandatory.
- Category: select the category.
- Set a Default value if needed
- Save and close when you’re done.


Step #3: Create a the article
- Log in on the back end.
- Navigate to Content -> Articles.
- Click on the New button on the top.
- Define a title.
- Open the More information tab.
- Add some text on the custom field.
- Click the Save & Close button on the top.

Step #4: View it on the front
- Create an article menu item in the menu manager and select the new article.
- Go to the front site of your Joomla installation.
- Open the article.
- Check if the custom field is displayed.


That are not all in Joomla 3.7. There are many other new features in Joomla! 3.7 that you will be interested in.


